Commands are the foundational elements of medical records in Canvas, utilized for both documentation and order placement. Every command needs to be committed in order to be final. In the case of ordering commands like Prescribe and Lab Order, the order will not be sent until you commit the command. The only exception to the commit requirement is with the Reason for Visit which is always considered committed.
While commands share basic functionality, they are also unique. At the bottom of this article, the commands will be linked and any variant functionality will be shared.
User's Guide
Command Types
Commands organize structured data within a note. Each command is linked to a specific section of a traditional SOAP note and visually represented by a color-coded banner for easy identification.
|
Subjective |
⚫ Black |
|
Objective |
🟢 Green |
|
Assessment |
🟠 Orange |
|
Plan |
🔵 Blue |
|
Procedures |
🟣 Purple |
|
History |
🟤 Brown |
|
Internal |
🔴 Red |
Command Library
⚫ Subjective
|
Command |
When to use |
|
Reason for Visit (RFV) |
Frames the motivation for the encounter. Chief complaint and reason for visit are used interchangeably. |
|
Captures the patient’s narrative about their current issue. |
|
|
Screens for symptoms across body systems. ROS are considered micro-templates for specific findings and be customized for specific findings. |
|
|
Gathers structured patient input. Built using custom micro-templates. It is considered a micro-template that can be custom built to support a practice's needs. |
🟢 Objective
|
Command |
When to use |
|
Records vital signs during an encounter. |
|
|
Documents an examination that has been performed. It is considered a micro-template and can be custom built to document specific findings. |
|
|
Uploads images to the patient chart. Requires the Canvas Remote app on iOS. |
🟠 Assessment
|
Command |
When to use |
|
Documents the assessment of an existing condition. Also accessible from the patient summary. |
|
|
Adds a new diagnosis to the patient's chart. |
|
|
Resolves an active condition currently listed in the patient's chart. Also accessible from the patient summary. |
|
|
Updates a diagnosis name/code without losing prior context such as the background or prior assessments. |
|
|
To order, document, and charge for a test that has been completed within the office at the time of the visit |
|
|
Allows providers to review and document new lab results. Includes communication to share with the patient and internal comments which will not be shared with the patient or posted on any external facing documentation. |
|
|
Allows providers to review and document imaging reports. Includes patient-facing communication and internal-only notes. |
|
|
Used to document the review of a consult report. Providers can add internal comments and patient-directed messaging. |
|
|
Documents the review of an uncategorized document, internal comments, and document how a patient should be made aware of results. |
|
|
Records the assessment of an existing condition. Considered a micro-template that is custom built to document specific aspects of an assessment. |
|
|
Delays a protocol for a specified period. |
🔵 Plan
|
Command |
When to use |
|
Summarizes the visit plan. |
|
|
Issues new prescriptions. |
|
|
Issues a refill for an existing prescription. |
|
|
Approves and notifies the pharmacy of a refill. |
|
|
Denies a refill request and notifies the pharmacy. |
|
|
Ends a medication course or discontinues it. |
|
|
Updates an existing medication’s dosage or schedule. |
|
|
Creates and sends a referral. |
|
|
Orders lab tests electronically or via printed requisition. |
|
|
Orders imaging studies. |
|
|
Documents instructions given to the patient. |
|
|
Provides patient education using Healthwise content. |
|
|
Prepares and schedules a follow-up appointment for a patient. |
|
|
Assigns patient-linked tasks. |
|
|
Tracks and updates patient care goals. |
🟣 Procedures
|
Command |
When to use |
|
Records and bills for in office vaccine administration. |
|
|
Records and bill for procedures completed in the office. |
🟤 History
|
Command |
When to use |
|
Records patient allergies. |
|
|
Removes previously documented allergies. |
|
|
Documents historical medication use. |
|
|
Adds historical immunization records. |
|
|
Documents relevant family medical history. |
|
|
Adds past diagnoses or chronic conditions. |
|
|
Records previous surgeries. |
🔴 Internal
|
Command |
When to use |
|
Used to copy and paste free text into the note. Will not be shared on any external documentation. |
|
|
Internal notes that can only be seen by the creator of the note. Will not be shared on any external documentation. |
|
|
Document a potential coding gap by suggesting a diagnosis that may be missing from the patient’s record |
|
|
Confirm a suggested coding gap as clinically relevant and document its validity in the patient’s record. |
|
|
Review a coding gap and either accept or refute it. |
|
|
Temporarily postpone action on a coding gap when additional information or follow-up is needed before making a decision. |
Command Function
Commands facilitate structured data entry in patient charts and are essential for efficient and accurate documentation.
Creating a Command
-
Within a note, type the name of the desired command into the note body.
-
Add each command on a new line.
-
Click or use keyboard navigation to select the appropriate command from the dropdown list.
Command Fields: consist of free text, structured and/or required fields.
-
Free text: Open entry without restrictions.
-
Structured fields: Dropdown menus for selection.
-
Required fields: Marked with red text and must be completed before committing the command.
Committing a Command
-
Click the colored button to the right of the command
-
Click the colored button to the right of the command (e.g., Record, Sign, Designate).
-
Removing a Command
-
An uncommitted command can be removed from a note by clicking the
Xbutton to the right of the command -
Once the command is committed, it cannot be reverted. If an error is made, the command will need to be entered in error.
Command Placement
Commands can be added directly to open notes or create new notes as necessary
Placing a Command in an Encounter Note
-
Place the cursor within an open note in the patient’s chart.
-
Use the relevant button in the Patient Summary or associated card in the Patient Panel to add the command.
Placing a Command into a Chart Review Note
-
Open the patient’s chart but do not click into a note.
-
Click an action button (stop, refill, review, etc) in the Patient Summary or Patient Panel to add a command. This creates a new Chart Review Note automatically.
-
Refresh the chart or manually create a new Chart Review Note if needed to ensure proper placement.
Commands initiated from the User Panel Filters in the Schedule View automatically create a locked Chart Review Note, eliminating the need to manually open the patient’s chart.
Moving Commands to New Note
The Move Commands feature allows uncommitted commands to be transferred from one note to another.
-
Open the note with the uncommitted commands that need to be moved.
-
Click the triple-dot menu in the note header and select Move Commands from the dropdown to open the modal.
-
Use the dropdown menu in the modal to choose the note where the commands will be moved.
-
Use the link in the confirmation message to verify that the commands have been successfully transferred
Only SDK enabled commands are able to be moved to a new notes. Reason for Visit will always remain in the original note.
Keyboard Navigation
Keyboard navigation increases user efficiency by allowing the completion of commands without the need of a mouse. While keyboard navigation is entirely optional, it does ensure streamlined, efficient charting and documentation in Canvas.
Navigation Basics
-
ENTER to select
-
TAB to navigate fields
-
ARROWS to move through dropdown menus
Navigating Fields
-
Free-text: Openly type in field
-
Dropdown menu: Use up/down arrows to navigate and ENTER to select.
-
Move fields: Press TAB to move to next field
-
Toggle/Radio Buttons: Press ENTER to switch on or off.
Committing Command
-
After completing fields, press TAB to highlight the commit button and press ENTER.
-
If the commit button has a dropdown - press TAB again, navigate with ARROWS, and press ENTER on the selected option.
-
Highlighting Text
-
SHIFT + L/R arrows: One letter at a time
-
SHIFT + Up/Down arrows: One line at a time
-
SHIFT + CTRL (Windows) or OPTION (Mac) + L/R arrow: One word at a time
Triple Dot Menu
Every command holds a triple dot menu to the right of the command. This opens a list of options pertaining to the command. Standard items found:
-
Carry Forward: Pulls in the last recorded response. Disabled for commands intended to reference patient-specific data.
-
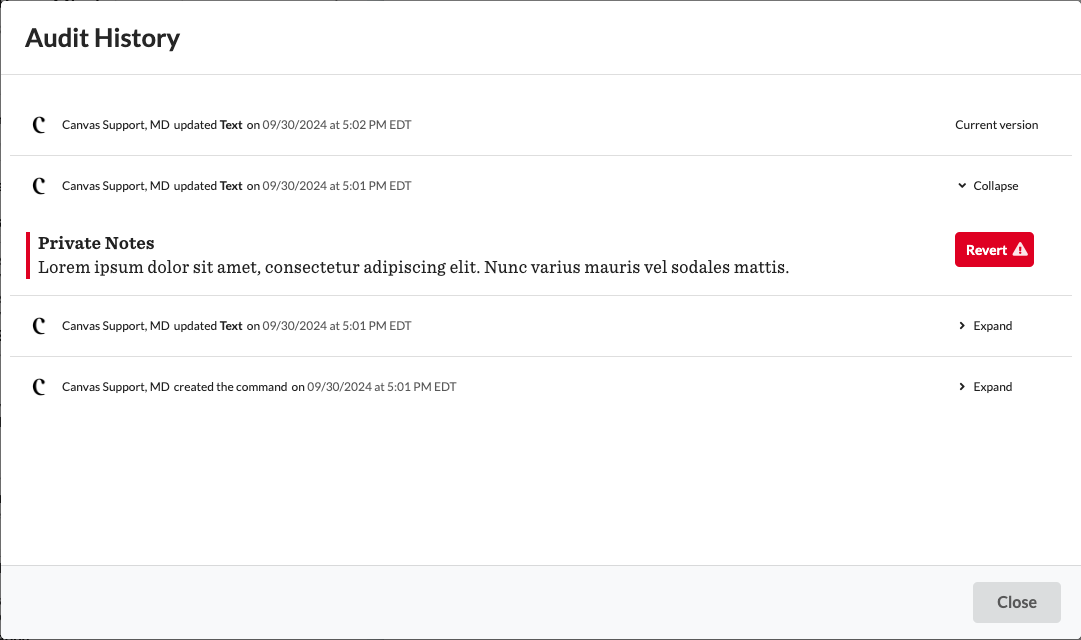
Audit History: Logs actions taken on the command with timestamps and user details.
-
Uncommitted Commands: Version history is accessible for uncommitted commands through the audit history. Users can click Expand and Collapse to navigate through various versions.
-
To restore a previous version, click Revert to replace the current state with the selected version.
-
-
Committed Commands: Version history becomes unavailable once a command is committed. The audit history will instead display a log of updates made before commitment.
-
-
Print: Allows command targeted printing or saving as a PDF.
-
Enter in Error: Marks committed commands as errors to remove from the patient record. It will be retained in the note with a strikethrough.
-
Create or Update Automation: Allows users to organize commands into reusable templates for efficiency and consistency. Review the Automations article for further details.
Configuration & Set Up
Managing Command Type Settings
Enabling or disabling specific commands ensures streamlined workflows and reduces clutter in patient charts:
To enable Command Type Settings, the practice must contact Canvas Customer Support to activate this permission.
-
Navigate to Settings > Practice: Command Type Settings to configure which commands are available for note documentation.
-
Search for commands needing modification using the search bar or filters.
-
Select the checkbox next to the command(s) needing modification
-
From the Action dropdown, select either Mark as active or
Mark as inactiveand clickGoto apply the changes

This setting applies exclusively to commands manually entered in the chart note. Users can still add commands in other parts of the application, such as the Patient Panel or Summary section.
Automations are unaffected by disabling command types. If a command is needed in an automation but not independently, create the automation before disabling the command.
FAQs
Q: Can I delete a command after it has been committed?
A: No, once a command is committed it cannot be deleted. Instead, you can use the Enter in Error function to mark it appropriately.
Q: What happens if I forget to commit an ordering command?
A: The order will not be processed or sent until the command is committed.
Q: Can commands be moved after being committed?
A: No, only uncommitted commands can be moved between notes.
Q: Why can’t I find a specific command in my note?
A: Check if the command is marked as inactive in Command Type Settings.
Keywords & Metadata
-
Keywords: commands, documentation, charting, clinical workflows, committing commands, chart review notes, move commands, command types, editing commands. remove commands
-
Categories: Documentation, Clinical Workflows, Canvas Medical Guide